1. Typecasting Object to Array PHP
$array = (array) $object;
2. Using the JSON Decode and Encode Method
json_decode(json_encode($object), true);

Full Stack PHP Developer
$array = (array) $object;
json_decode(json_encode($object), true);
=   equals
!=  does not equal
>   greater than
>=  greater than or equal to
<   less than
<=  less than or equal to
LIKE and NOT LIKE
LIKE and NOT LIKE are SQL operators that let you add in wild-card symbols, so you could have a meta query that looks like this:
array(
    'key' => 'name',
    'value' => 'Pat',
    'compare' => 'LIKE'
)
This would return all posts where the meta value “name” has the string “Pat”. In this case, “Pat” “Patricia” and “Patrick” would all be returned back to you. There’s a non-WordPress tutorial explanation here.
Adding the wildcard character % isn’t necessary, because it gets added by default like @Herb said in his below answer. Like this: $meta_value = '%' . like_escape( $meta_value ) . '%'; – see source.
IN and NOT IN
IN and NOT IN select any matches that are in (or not in) the given array. So you could do something like this:
array(
    'key'     => 'color',
    'value'   => array('red', 'green', 'blue')
    'compare' => 'IN'
)
and it would get all posts that have the color set to either red, green, or blue. Using ‘NOT IN’ gets the reverse, any posts that have a value set to anything else than what’s in the array.
The generated SQL for this would look something like this:
SELECT * FROM posts_meta WHERE value IN ("red", "green", "blue")
BETWEEN and NOT BETWEEN
BETWEEN and NOT BETWEEN allow you to define a range of values that could be correct, and require you to give two values in an array in your meta_query:
array(
    'key' => 'price',
    'value' => array(20,30)
    'compare' => 'BETWEEN'
)
This will get you all posts where the price is between 20 and 30. This person digs into an example with dates.
NOT EXISTS
NOT EXISTS is just like what it sounds – the meta value isn’t set or is set to a null value. All you need for that query is the key and comparison operator:
array(
    'key' => 'price',
    'compare' => 'NOT EXISTS'
)
This person needed to query non-existent meta values, and needed them to play nice with others.
HTML
<div class="videoWrapper">
<iframe src="http://www.youtube.com/embed/mC-zw0zCCtg" width="560" height="349">
</iframe>
</div>
CSS
.videoWrapper {
position: relative;
padding-bottom: 56.25%; /* 16:9 */
padding-top: 25px;
height: 0;
}
.videoWrapper iframe {
position: absolute;
top: 0;
left: 0;
width: 100%;
height: 100%;
}
Relative length units specify a length relative to another length property. Relative length units scale better between different rendering mediums.
Source: W3School
rem is a CSS unit that is relative to the font-size of the root element.
0.25rem is 4px
0.50rem is 8px
0.75rem is 12px
1rem is 16px
Here’s a helpful chrome extension to help you convert px to rem called PxtoRem: https://chrome.google.com/webstore/detail/pxtorem/ldbemkmafmibhpncgagpegmhbhpolnlp?hl=en
Animista is a good resource for animations. It generates code that you will need. It is limited but is helpful in so many cases.
https://animista.net/play/entrances/slit-in
Did you ever had a hard time figuring out why you cannot connect to your EC2 Instance? And the response you are getting is “Connection Time Out”.
Well, it happened to me. It has been a long time since I connected to that server and I was thinking I must have the wrong username and password but that wasn’t the case.
It only needs a simple fix.
1. Go to your EC2 Instance and check your Security Group
2. Go to your Security Group
3. Check the Inbound tab
4. Check if your IP is in the list and if it’s not, that’s most likely the problem why you are not able to connect to your server.
Just add a rule. Select SSH and add your IP address/32 then SAVE.
You should be able to connect to your server.
Code:
$var = "I am a developer";

if (strpos($var, 'dev') !== false) {
     echo 'true';
}
Output:
true
Here’s how you can add an HTML code on a data-content of a Bootstrap popover. On the example below, we’re going to add a link on our popover.
Below is a typical Bootstrap popover code.
HTML
<a href="#" role="button" class="popover" data-toggle="popover" title="" data-content="Sample Content <a href='http://winnieverzosa.com' title='sample link'>LINK</a>" data-original-title="Sample Title">Click me</a>
All you need to do is to pass an object to the popover function with a property HTML and set it to true.
JavaScript
<script>
$("[data-toggle=popover]").popover({html:true})
</script>
And that is it! You should be able to add any HTML code on your data-content.
Here’s you can manipulate the size of your popover.
You can just simply pass an object to the popover function with a property container and assign ‘body’ to it.
JavaScript
<script>
$("[data-toggle=popover]").popover({container: 'body'})
</script>
CSS
.popover{
    max-width: 100%; /* Max Width of the popover (depending on the container!) */
}
Let’s put these together and here’s how you can use it.
HTML
<a href="#" role="button" class="popover" data-toggle="popover" title="" data-content="Sample Content <a href='http://winnieverzosa.com' title='sample link'>LINK</a>" data-original-title="Sample Title">Click me</a>
JavaScript
<script>
$("[data-toggle=popover]").popover({html:true, container: 'body'})
</script>
CSS
.popover{
    max-width: 100%; /* Max Width of the popover (depending on the container!) */
}
Run snippet here -> https://www.bootply.com/winnieverzosa/7OYbHIuCUw
It’s never fun when your WAMP server is not loading up correctly. Have you ever encountered this error before saying local server – 1 of 2 services running?
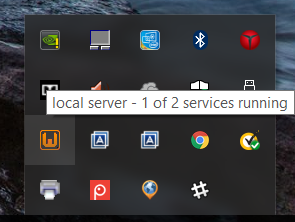
First, let’s check which service isn’t working. I always check Apache first. Left click WAMP server icon and click Service administration.

If the Apache service is running, we should see the Stop Service option enabled but in this case, it hasn’t even started yet.
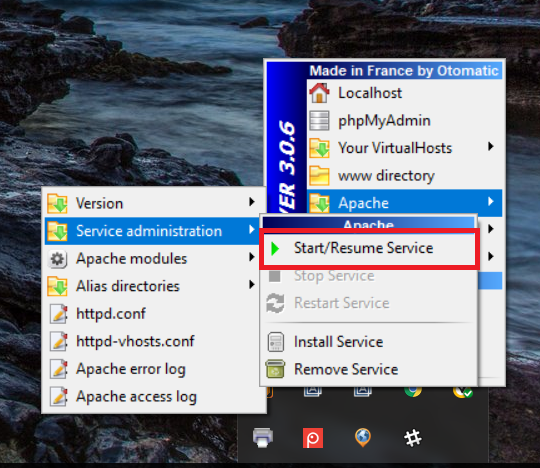
So in order for us to fix this problem, we need to know what is causing this to happen. We can then do the following to know why it’s failing to start to begin with.
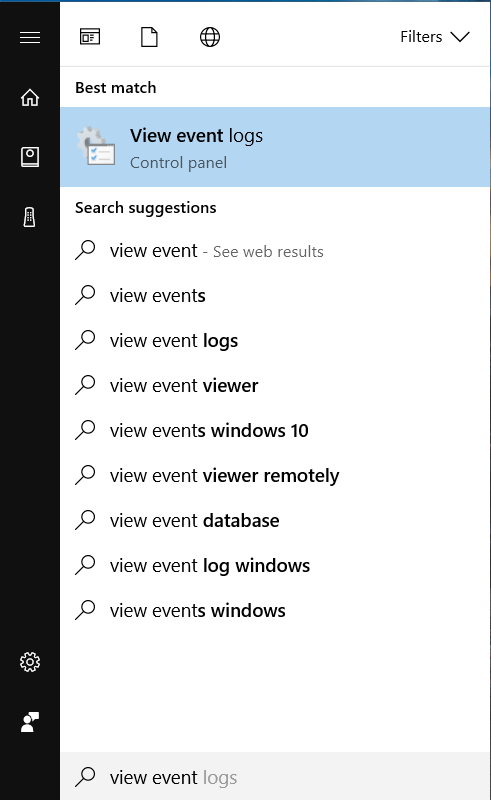
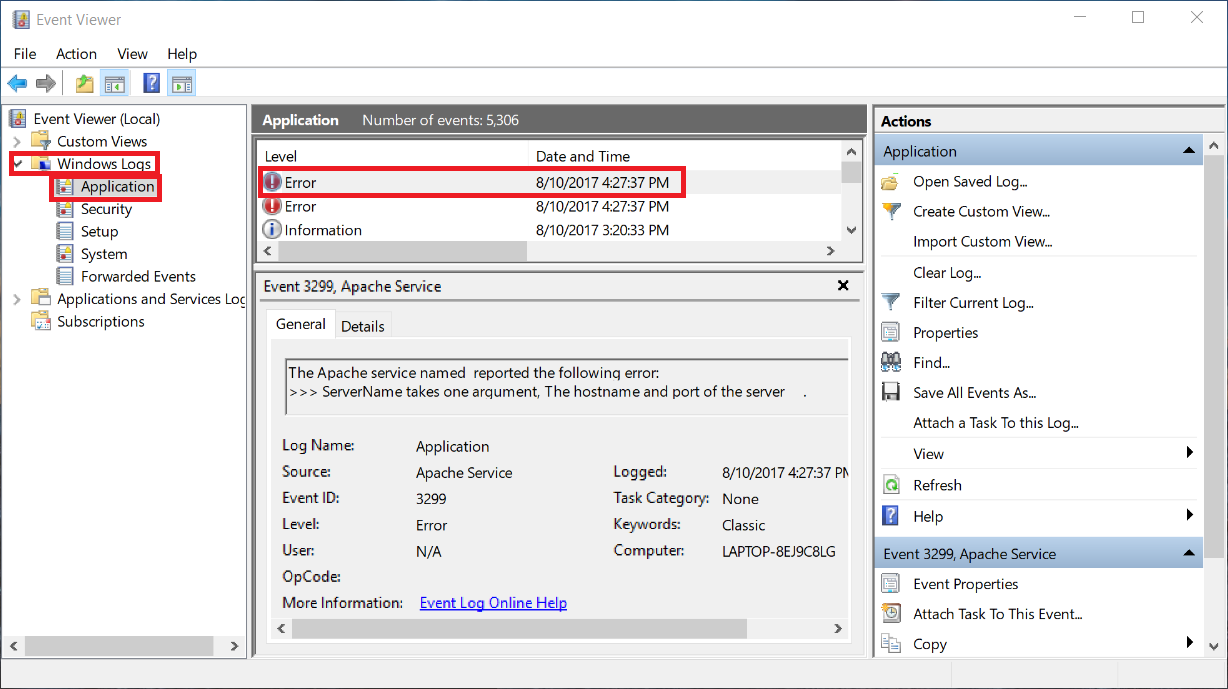
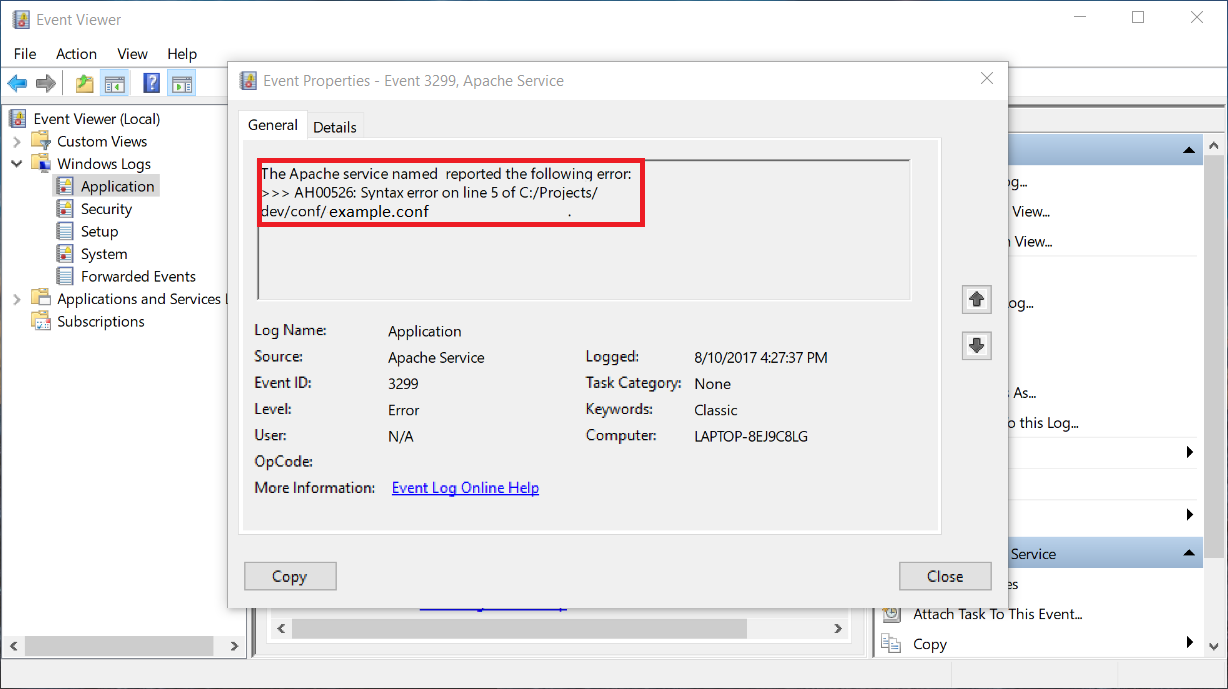
Once you’re done addressing the issue, go give it a try and restart your WAMP server. If it’s still not working, check the event logs again for more details about the error. Once everything has been addressed, your WAMP server should turn GREEN and work properly.
As I was done creating my PHP file in my Ubuntu server, I tried loading up the page and the page wasn’t rendering the PHP code correctly. It was rendering my PHP code as a text.
If this is also happening to your website, here are some stuff you can start doing to properly load up your PHP page file on your Ubuntu server.
The first step is to install the necessary packages on your Ubuntu server.
sudo apt-get install apache2 php7.0 libapache2-mod-php7.0
It’s good to verify the PHP module is loaded. You can do so by running the code below.
a2query -m php7.0
If not enabled, do the following.
sudo a2enmod php7.0
Once all those setups are done, the last step is to restart apache.
sudo service apache2 restart
Go to your browser and try loading up the page again. Your page should load up correctly.
Enjoy coding!